Acuity Scheduling Integration

Get Automatic Text Message Updates on Your Acuity Scheduling Appointments with DialMyCalls and Zapier
In this article, we’re going to show you how to combine Acuity Scheduling and DialMyCalls using Zapier. Zapier is a platform that makes automating different services super easy, saving you time and resources in the long run.
The example we’re going to use today involves automatically sending yourself a text message notification when someone schedules an appointment with you or your business through Acuity Scheduling. However, you can modify this automation to text you when an appointment is scheduled, when it’s about to start, when it’s been rescheduled, and more. You can even create separate automations for each of these events – this tutorial is just the beginning!
DialMyCalls is a mass texting platform for automatically sending SMS (text) messages, either to individuals or groups. By combining it with Zapier, you can send SMS text messages automatically, creating a useful and interactive notification system. Though we’re just going to be sending text messages to ourselves in this example, you can apply this service to your business in several ways.
What You’ll Need:
- A Zapier account (free)
- A DialMyCalls account (free)
- An Acuity Scheduling account (free/$15+)
Step 1: Create Your Zap
The first step in getting any Zap off the ground is creating it! To do this, log in to your Zapier account and head over to your Dashboard.
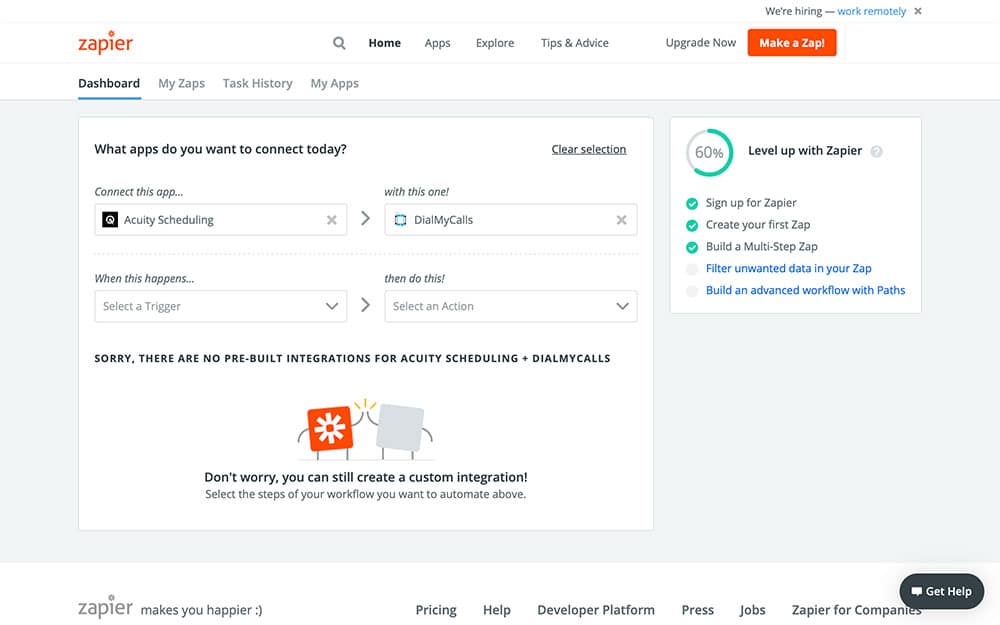
In the middle of the screen is a box labeled What apps do you want to connect today? This is where we’re going to turn our attention. As you can see in the image above, we’ve already filled in Acuity Scheduling in the Connect this app… field and DialMyCalls in the with this app! field. To do this for yourself, just type each into their corresponding fields and select them when they appear as options.
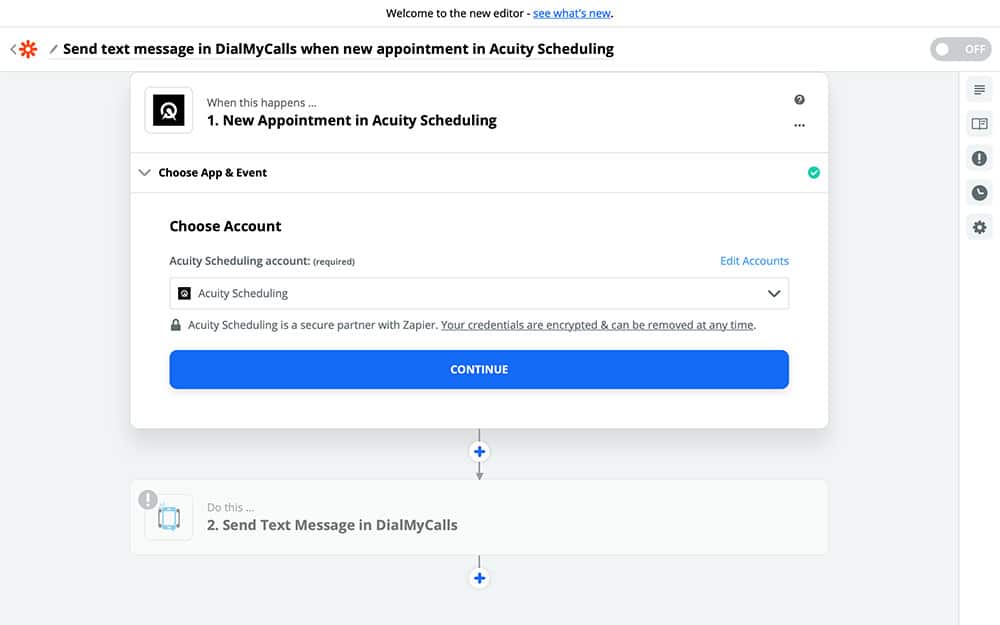
Next, we’re going to fill out the third and fourth fields, starting with When this happens… Open the dropdown menu and select New Appointment:
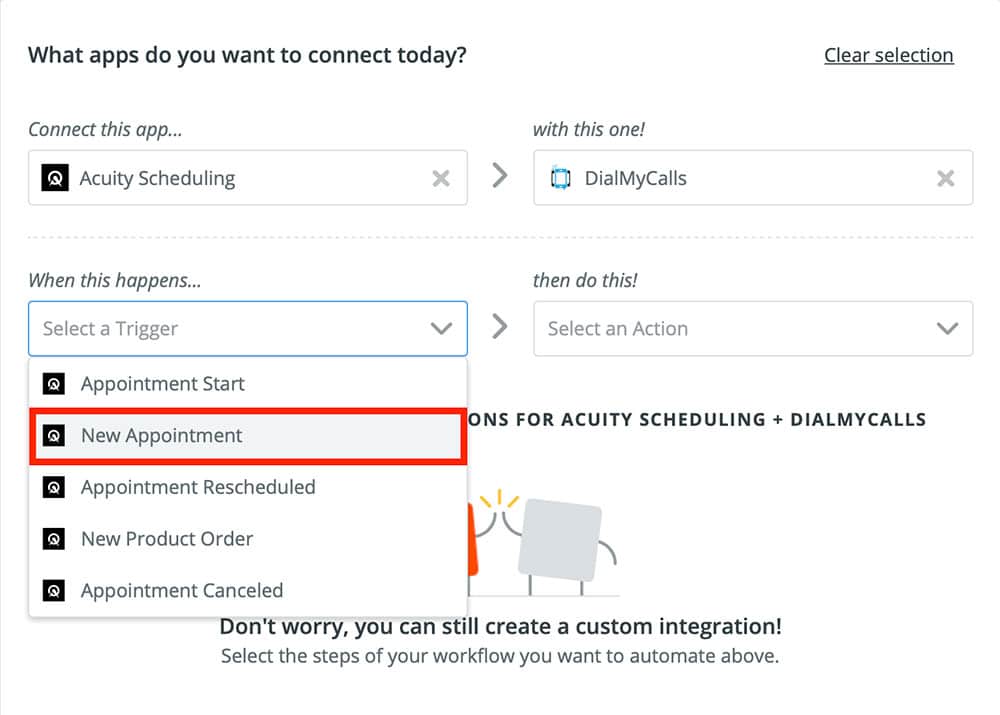
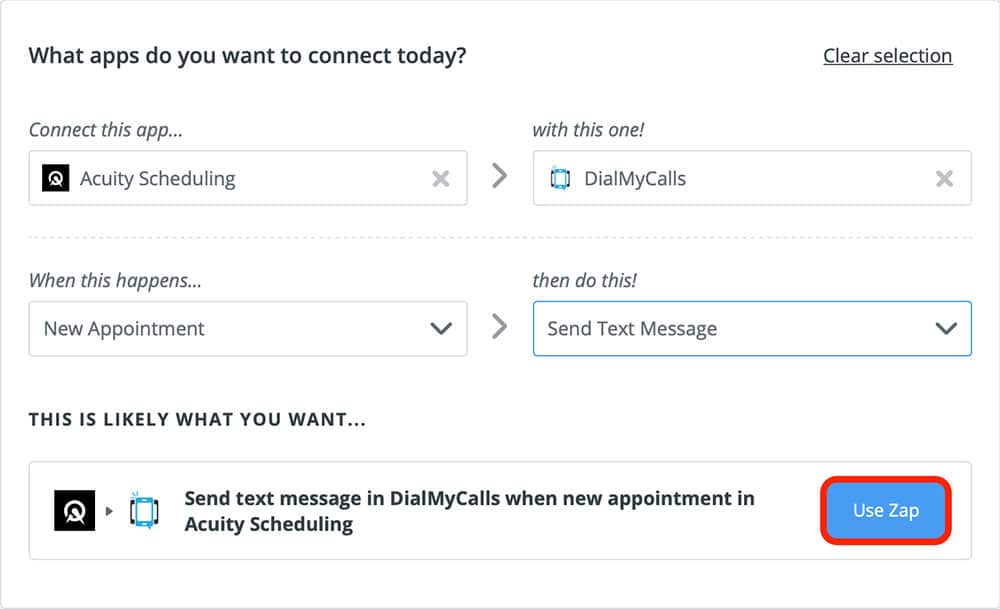
This is going to be our Zap’s Trigger, or the thing that tells it when to run. Every time we get a new appointment in Acuity Scheduling, this Zap will perform an Action. In this case, our Action is going to be sending a text message. So, in the fourth and final field, then do this!, go ahead and choose Send Text Message from the dropdown menu.
Once you’ve done that, go ahead and press the blue Use Zap button:
Step 2: Connect Your Acuity Scheduling Account
With that out of the way, it’s time to start setting up our Zap, starting with connecting your Acuity Scheduling account to Zapier. After pressing the Use Zap button, Zapier will take you to this page:
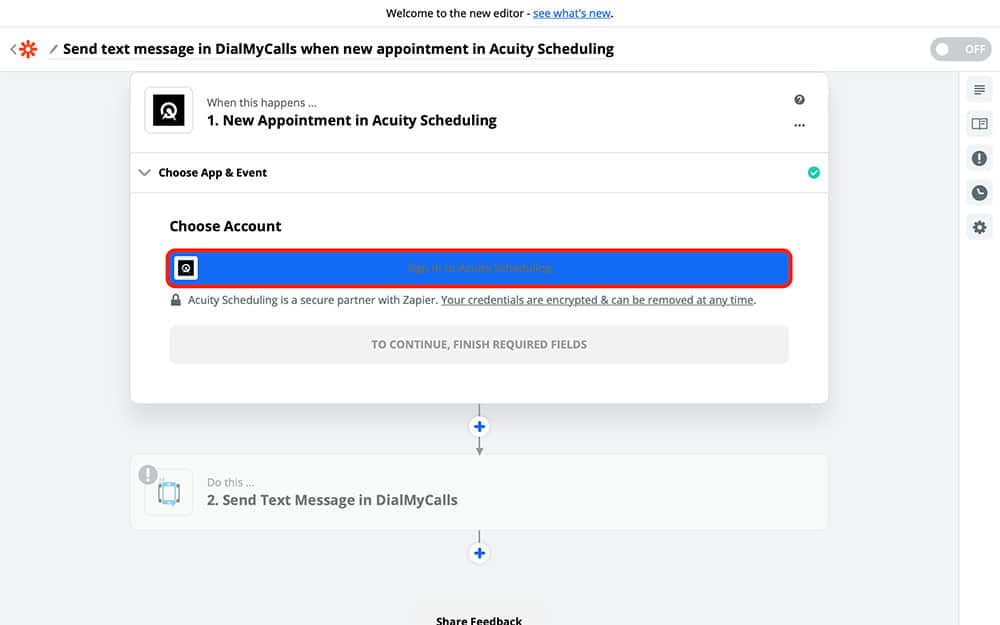
This is where we’re going to start customizing our Zap. First, though, we have to connect Acuity Scheduling to Zapier, which is pretty simple! If you’ve already used the two services together before, you should already see your Acuity Scheduling account listed as an option. Otherwise, go ahead and click the blue bar, as outlined in red above. That will redirect you to this page in a new tab:
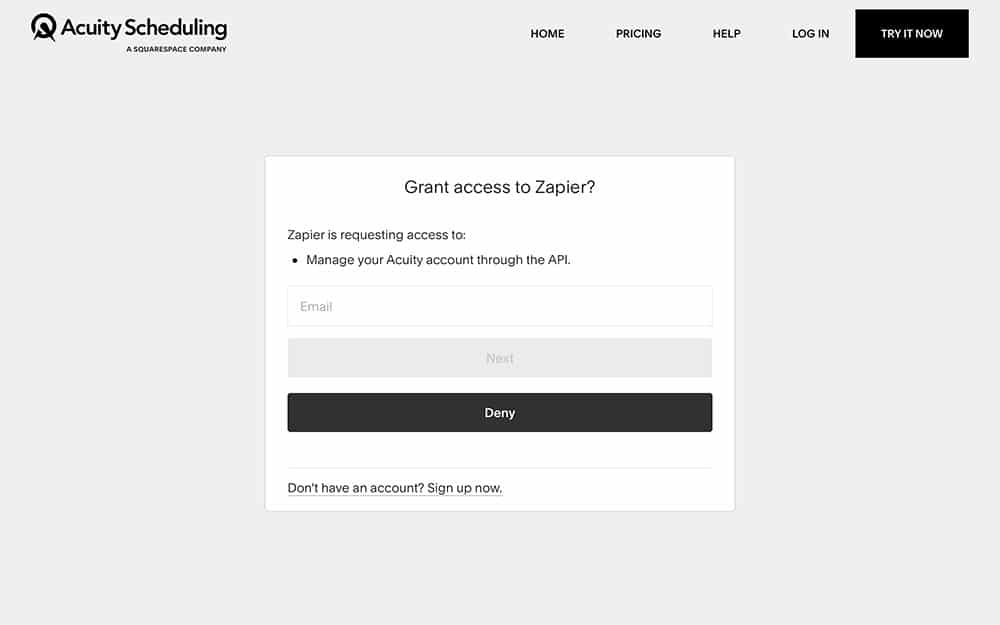
All you have to do from here is enter your Acuity Scheduling login information and choose Allow Access:

All this does is gives Zapier permission to pull information from your Acuity Scheduling account, which we’ll need to do for the Zap to work. Once you choose Allow Access, Zapier will take you back to the Zap creation page, where you should now see your Acuity Scheduling account selected:
Once you’re ready, go ahead and press the blue Continue button.
Step 3: Customize Your Acuity Scheduling Trigger
That will bring you to a page where you can start customizing your Zap’s Trigger. If you leave this section blank and just continue to the next step, this Zap will run for every new appointment you receive through Acuity. By customizing it, you can set it to only use appointments from a specific calendar, appointments of a specific type, or both.
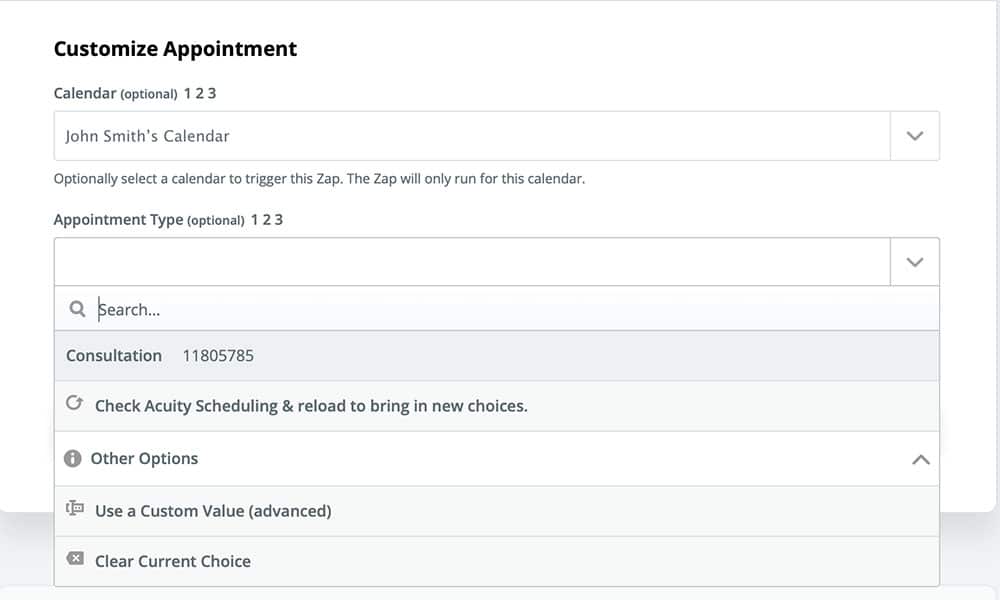
Once you’re happy with your settings, you can Continue.
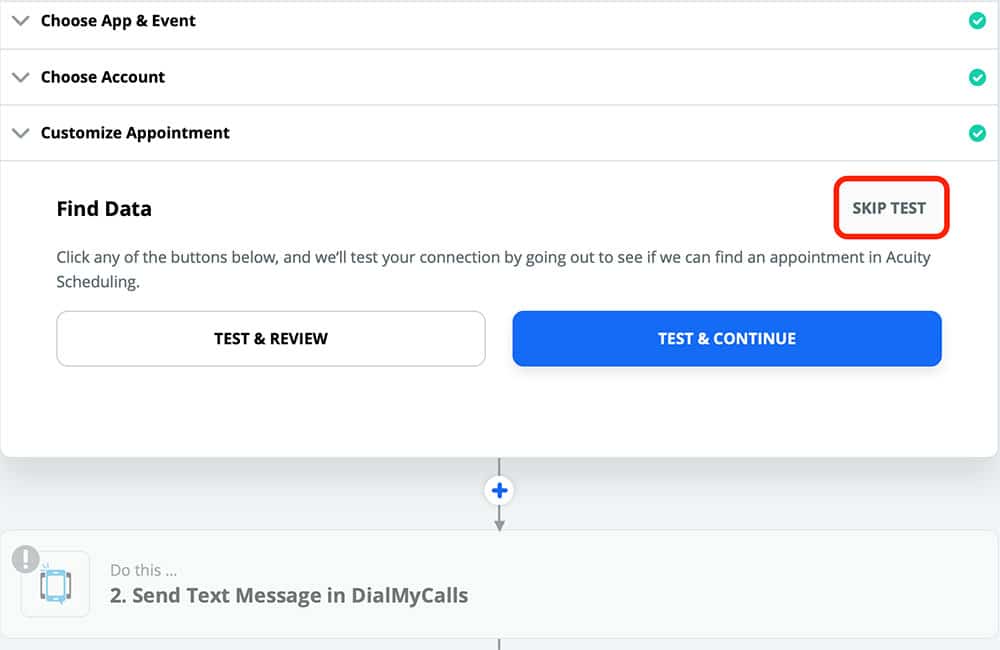
On the next page, Zapier will ask you if you want to test your Zap. This is just to make sure that everything is working as expected so far. You can test it now if you like, though we recommend waiting until the end since there isn’t much to test yet. If you’d like to test it anyway, just choose TEST & CONTINUE, otherwise, you can choose SKIP TEST:
Step 4: Create Your DialMyCalls Action
Now it’s time to get into the fun part: Creating your DialMyCalls Action. You should be looking at the following screen:
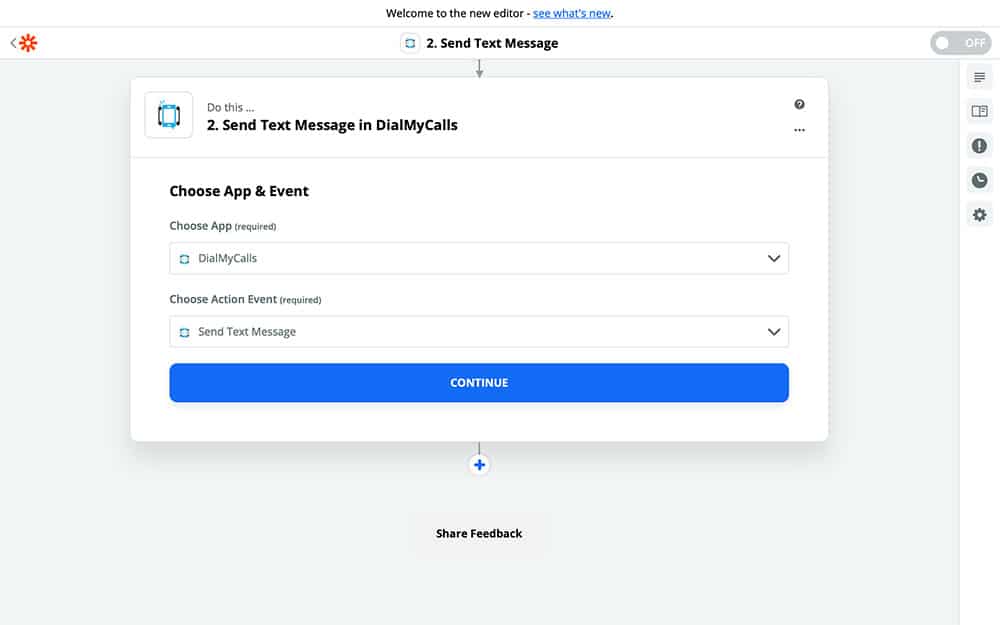
So long as you have DialMyCalls selected and Send Text Message set as your Action, you can press Continue. Once you do that, Zapier will ask you to connect your DialMyCalls account to Zapier:
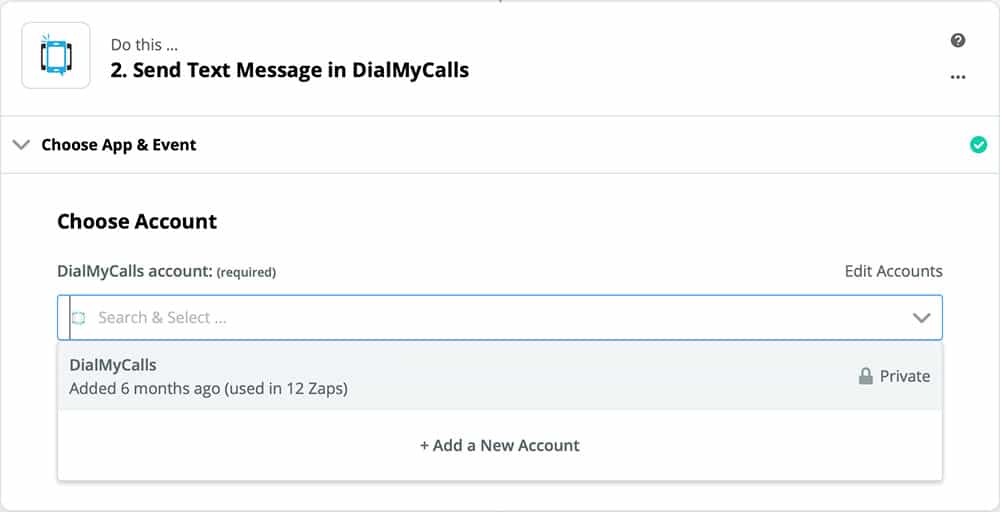
Like with Acuity Scheduling, you’ll need to connect your DialMyCalls account to continue. If you’ve already used DialMyCalls with Zapier before, you’ll see your account listed as an option, like in the image above. Otherwise, you’ll need to click the blue bar again and follow the steps for connecting your DialMyCalls account. Once your account is connected and selected, go ahead and Continue.
After that, you’ll be faced with your Action template:
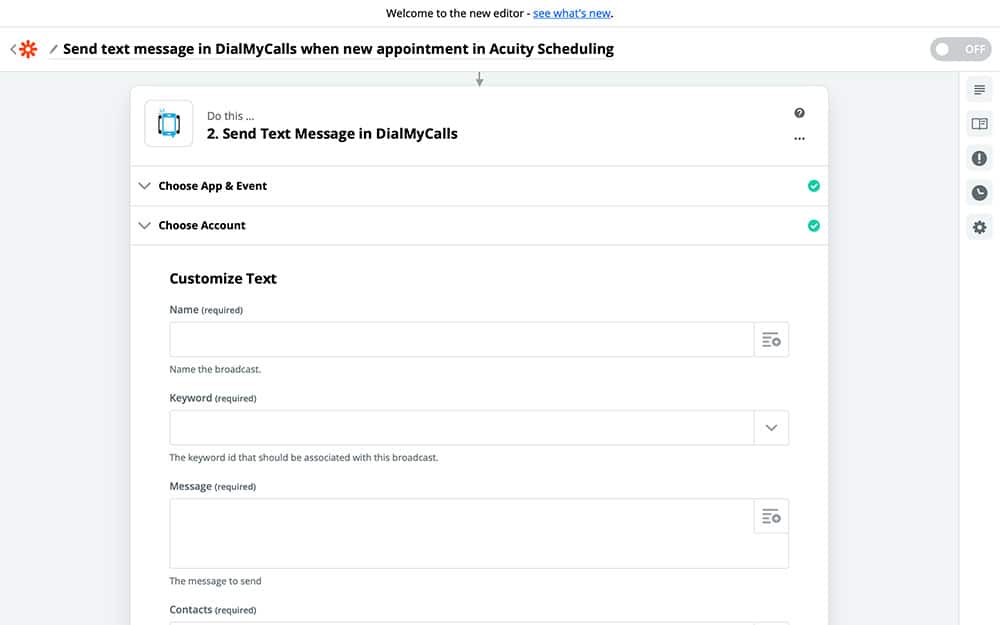
This is a more sophisticated version of how we customized our Acuity Scheduling Trigger. In this section, we’re going to specify exactly how we want your Zap to run so that it is personalized and consistent. Remember, the goal of this Zap is to send yourself a notification every time you get a new Acuity Scheduling appointment, which is how we’re going to set this template up.
First, you’ll need to give your text message notification a name. You can give it a fixed name by typing something like “New Appointment Notification,” in the Name field. However, you can also create a name that changes to match the notification, which is what we’re going to do.
From the Name dropdown menu, choose First Name. You’ll see a random name filled in; don’t worry about this, it’s just there to show you how this Zap will work. It’s not actually going to use that name when the Zap runs for real.
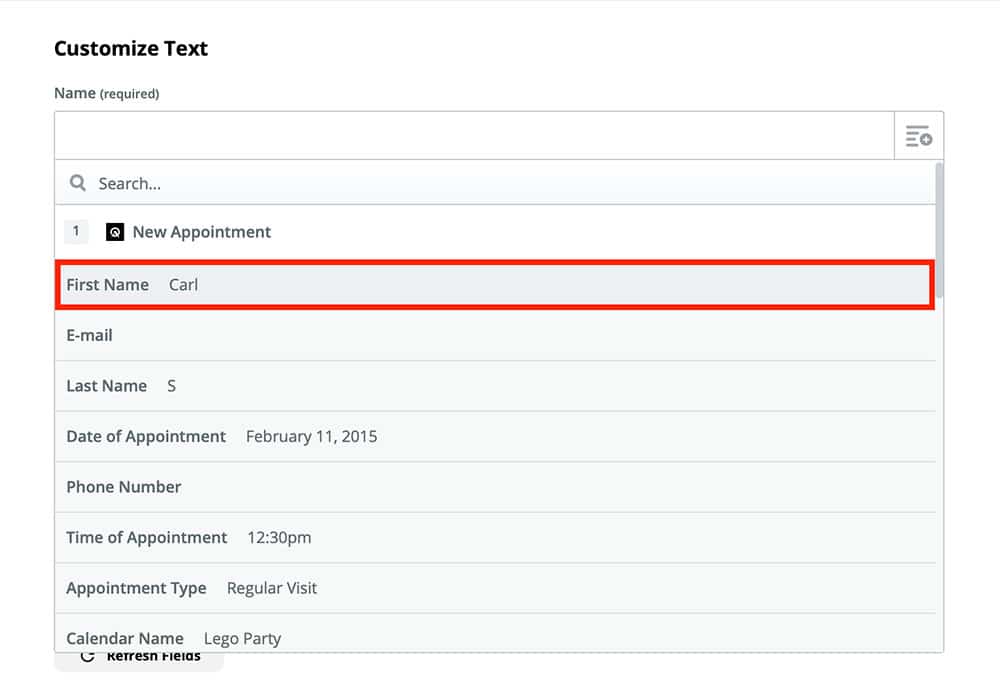
Once you’ve selected First Name, type a space after it so that your variables don’t run together (i.e., “CarlSFebruary”).
Next, still picking from the Name dropdown menu, choose Last Name:
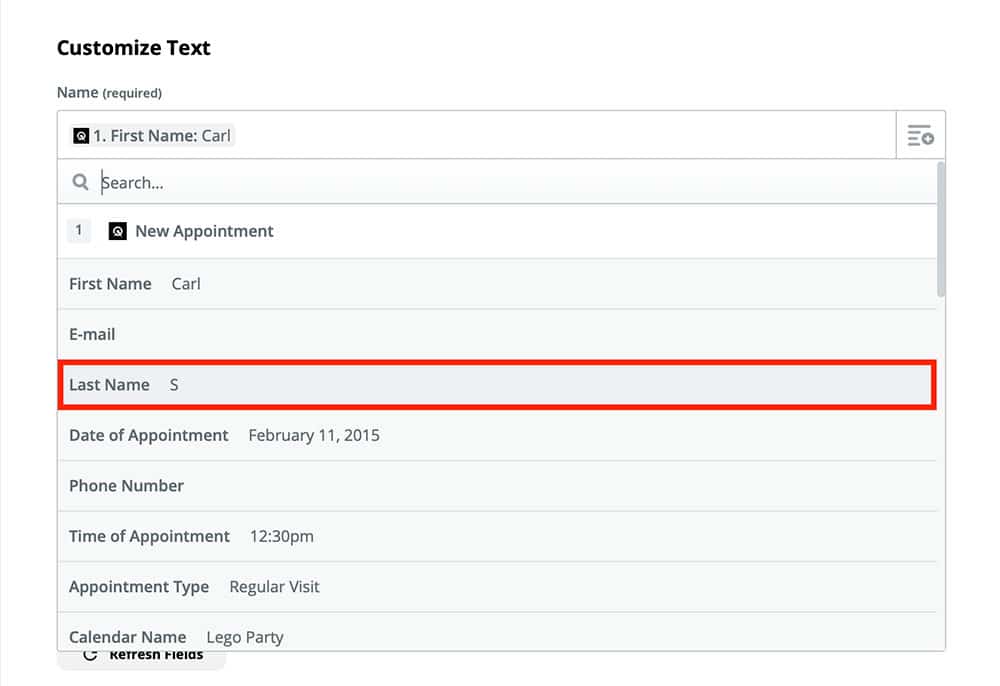
Type another space after that, and finally, choose Date of Appointment:
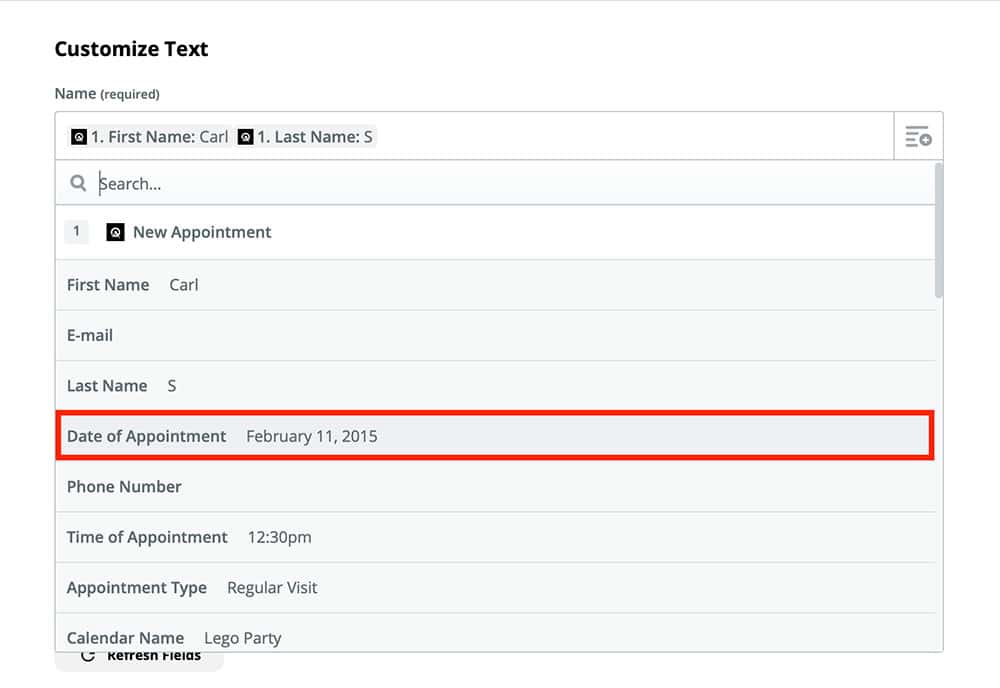
Now all of your notifications will tell you who the appointment is for and when it is scheduled right off the bat.
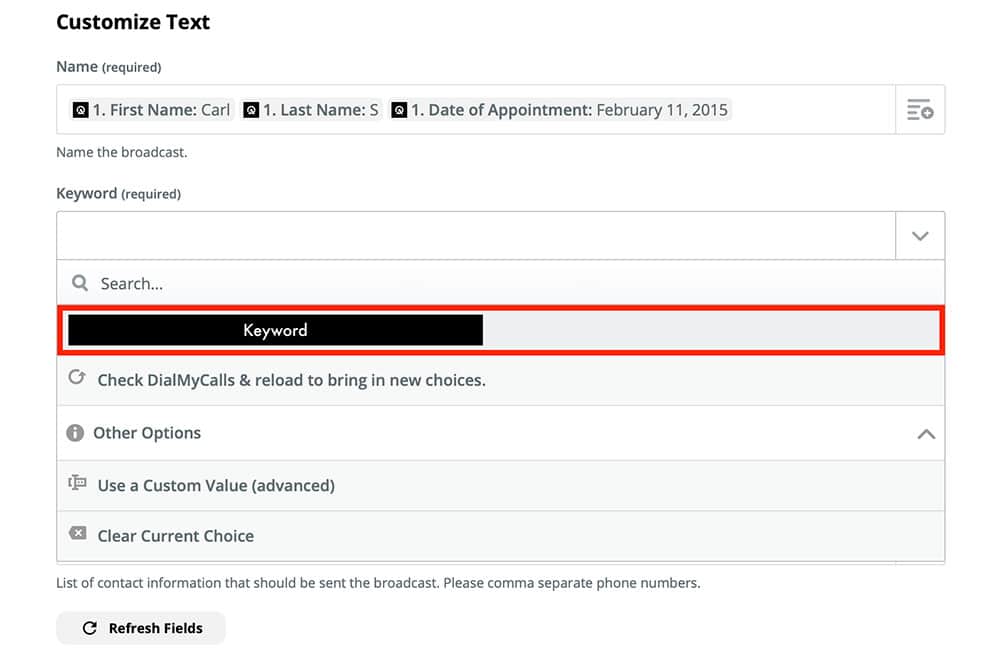
Next, you’re going to fill in the Keyword field. Your DialMyCalls keyword is what informs your recipients (in this case you) who is sending the text message. All DialMyCalls accounts have a random keyword generated by default, though you can upgrade to a custom one at any time. From the Keyword dropdown menu, choose your desired keyword:
Next is the Message field, and it’s where you get to show a bit of creativity. This is what your SMS notification is going to say when it gets sent to your phone, so if you type something like, “Hi [name], you have a new appointment!” you’ll receive a notification that says that every time you get a new Acuity Scheduling appointment.
As you can see, though, that’s not a very helpful message (even though it is friendly), as it doesn’t tell you anything about what the appointment is about, who it’s for, etc. To make it more helpful, we’re going to combine the text message with variables from the dropdown menu so that you get a logical, simple, and clear message informing you about each of your new appointments. Yours might look something like this:
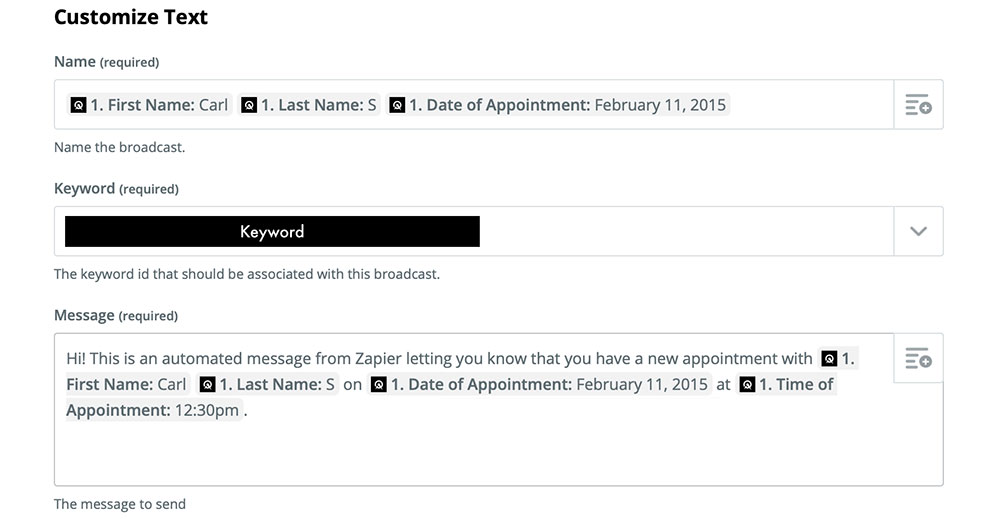
You can copy the one above as is, or modify it a bit to include the information you care about most.
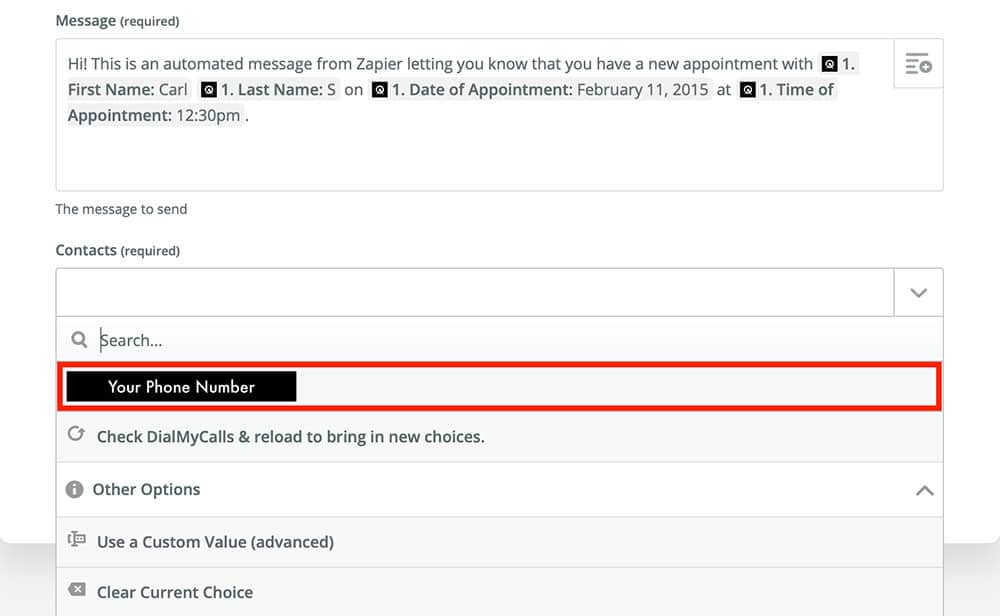
Finally, all that’s left to do is choose your Contacts. In this case, the only number you need to choose is your own, unless you plan on sending these notifications to others. Make sure that your phone number has been added to DialMyCalls and choose it from the Contacts dropdown menu:
Once you have every field filled in and your happy with how everything looks, go ahead and Continue to the next step.
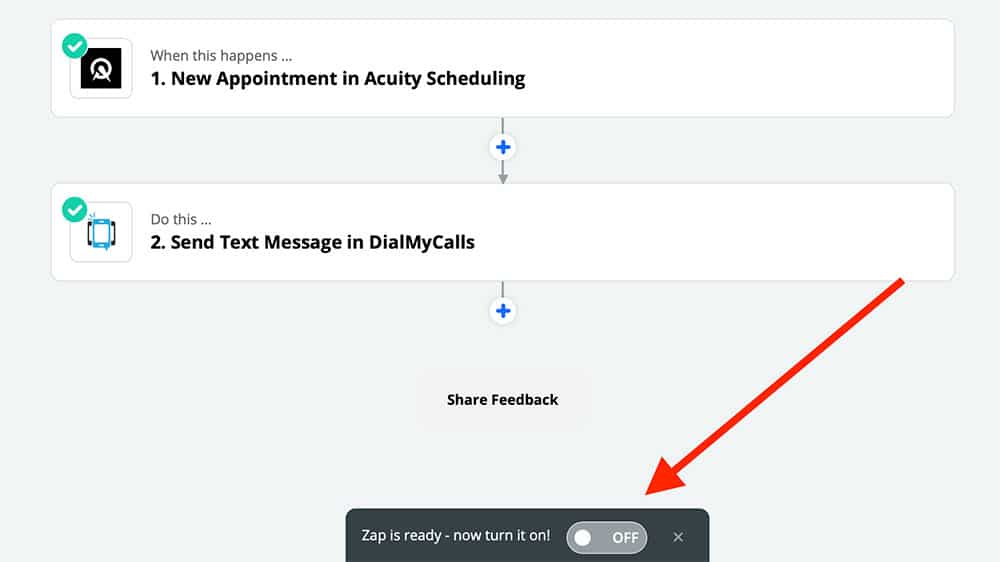
Step 5: Turn On Your Zap
That’s right! All that’s left to do is turning on your Zap. After pressing Continue in the previous step, Zapier will bring you here:
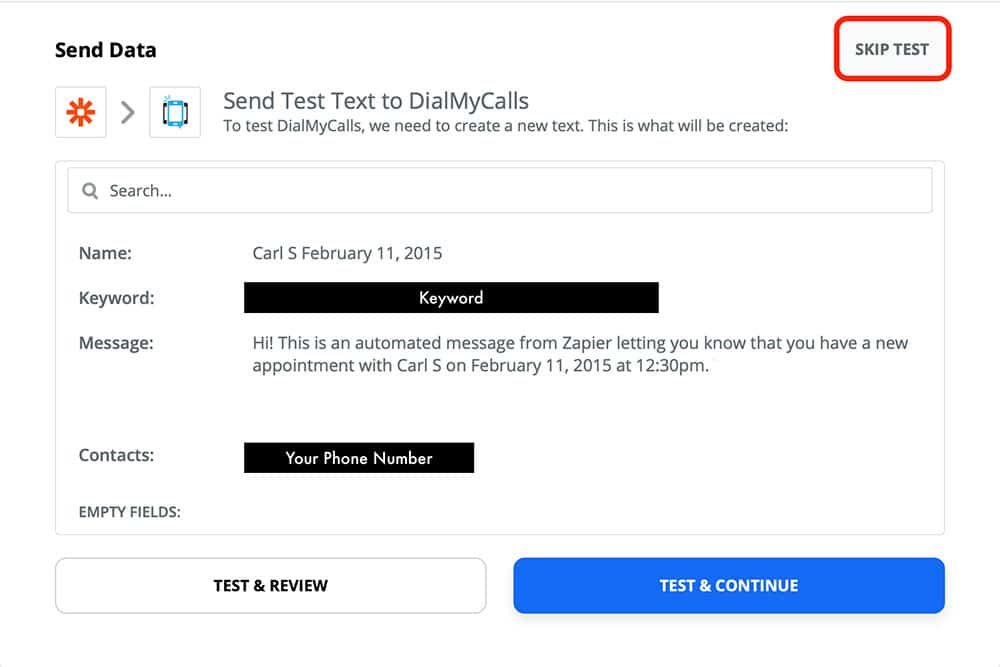
On this page, you can look over all of the information you entered in your Action template and make sure it looks how you wanted it to – this is how your message will appear when it’s sent to your phone. If everything looks good, you can test your Zap now and it will send you the sample message you see above. Otherwise, you can choose SKIP TEST.
After that is the last page, where all you need to do is flip the switch to turn on your Zap:
DialMyCalls + Acuity Scheduling Integration Conclusion
Here’s a quick recap of everything we did:
- Created a new Zap
- Chose Acuity Scheduling as our Trigger app and DialMyCalls as our Action app
- Connected our Acuity Scheduling account to Zapier
- Completed our DialMyCalls Action text message template using Acuity Scheduling variables
- Tested our Zap and turned it on
Now that your DialMyCalls + Acuity Scheduling Zap is up and running, you’ll have an easier time keeping your appointments organized and staying up to date with your Acuity Scheduling commitments. As long as this Zap is on, you’ll always know the moment you get a new appointment, via SMS text message, which will allow you to provide your clients with a better service.
In addition to this Acuity Scheduling Integration, you can create more Zaps using Zapier and DialMyCalls. If you don’t already have a DialMyCalls account, sign up for free today!