How to Send Automated Texts in 2026 (Easy & Fast Way)
Automated texts are every businessperson’s best friend, mainly because they make communication 10 times easier. However, beyond knowing the whys of automated messaging, you should know how to send automated texts to see results. That’s where we come in.
This comprehensive guide will demonstrate how to send automated texts in 2026. We’ve done some heavy lifting behind the scenes, discovering how to send automated texts using an Android or iOS device or a mass texting app like DialMyCalls. All you need to do now is sit back and let us walk you through the process. Ready?
What You Should Consider During Text Automation
Setting up a system to auto-send messages can bring new meaning to ease of communication in your business. Not only does it reduce your workload, but it ensures the timeliness of messages and increases communication efficiency. However, like any business strategy, various things must be considered when implementing it. Some of these factors include:
Consideration 1: Data Privacy and Security
As advantageous as text automation is, all those benefits can go down the drain if your methods don’t ensure recipient data privacy and security. In other words, if your company doesn’t ensure complaint texting practices, you risk breaching laws like the Telephone Consumer Protection Act (TCPA). This, in turn, can result in lawsuits, fines, and other legal consequences.
One way to ensure data privacy and security is to assess text automation tools before using them. For example, before using a third-party application, you can check its privacy policy to confirm the safety of the information you share. This reduces the chance of privacy infringement or data mishandling. It’s also vital to stay updated about text messaging laws and privacy regulations.
Consideration 2: Automation Tools
Text automation often involves using messaging tools to reach your audience and improve the efficiency of your communication. However, with how popular text messaging tools have become, you must take extra care while choosing one.
Before making a choice, you should analyze your needs and determine the purpose behind your text automation. This could be to pass information to your audience, build a notification system for your company, or send short alerts within an organization. Specifying your needs beforehand gives you a blueprint for finding the right text automation tool that meets your standards.
Consideration 3: Cost-Benefit Analysis
Text automation, especially with mass texting, comes at a price. This cost varies depending on the platform you use, its features, and external factors like carrier costs. For any text automation strategy to be efficient, its benefits should be worth its price.
With this in mind, you must perform a cost-benefit analysis before implementing a system to send automated messages or text blasts. This will tell you the worth of the text automation tool or platform, ensuring you get the most at a reduced cost.
Consideration 4: Scalability and Flexibility
Make sure your text automation system can grow with your needs. It should be able to handle more text as your business expands. Also, choose a system that can easily adapt to different kinds of content, multiple languages, and changing business demands. Look for a solution that allows customization and integrates smoothly with your other tools and processes.
Types of Automated Text Messages
According to Statista, US citizens alone send around 2 trillion text messages per year. This demonstrates how popular texts have become today. From conversational texts to automated ones, text messages are among the primary virtual communication methods for individuals and businesses.
Mass Texting, Made Easy
Send Bulk Text Message Campaigns in Seconds
Today, automated text messages come in various forms, each with a different purpose. In this section, we will explore some types of automated messages:
1. Scheduled Messages
In practice, being available 24/7 to send messages is nearly impossible. Not only does it keep you from attending to other tasks, but it can also lead to delayed message delivery due to human error. Thankfully, with scheduled messages, you don’t have to worry about forgetting to send a text.
This automated text message requires the sender to prepare the text beforehand and set a date and time for the system to send it. It is one of the most popular types of automated text messages, popularly used to send appointment reminders and event notifications. Here’s an example:
Example: Meeting Reminder
Good day, [RECIPIENT NAME],
Our first quarterly meeting will be on March 21st at 12:00 PM in the department’s conference room. Punctuality will be appreciated. Thank you!
2. Autoresponders
Autoresponders are the most basic form of text automation. Fundamentally, this automated message works by sending a message in response to a trigger keyword. Autoresponders are common in companies that use short codes to communicate with clients.
Often, autoresponders are set up as a system to confirm a subscription or as a second step in a marketing campaign. The autoresponder automatically confirms their response when someone subscribes to a particular service via an SMS, website, or email campaign by sending a keyword to a short code. These messages can look like this:
Example: Welcome to the Tribe, [CUSTOMER NAME]!
If you see this message, you’ve just subscribed to be a part of [COMPANY NAME]’s tribe. As a member, you will receive notifications about our most recent updates and news before anyone else. Also, you have access to exclusive offers delivered straight into your inbox! Thank you for subscribing!
If you want to opt out of this service, send [KEYWORD] to [COMPANY SHORT CODE].
3. Recurring Text Messages
Also known as “repetitive messages”, these automated messages work by sending texts at stipulated regular time intervals. Although this type of automated texting is similar to scheduled messaging, the former only sends the message once. If the message is set to be sent at a particular time every day, week, or month, it becomes a recurring text message.
You can use recurring messages to send quarterly budget review notifications or even daily task update reminders like this one:
Example: Daily Task Update
Good Morning, [RECIPIENT NAME],
Please remember to clock in and upload your tasks today before 10:00 AM. Also, remember to check each box as you perform your tasks. Have a splendid day!
4. Transactional Messages
Transactional messages are texts the recipients receive after performing a transaction or an action. They include order confirmations, shipping notifications, password reset messages, or even account activity alerts. Here’s an example:
Example: Your Order #236748 has been Confirmed!
Hello, [RECIPIENT NAME].
Thank you for your purchase! We’ve confirmed your order and are preparing to ship your items. Did you forget something? No worries. You can review your order here [LINK].
5. Feedback and Surveys
Companies often use text messages to gain their customers’ insights into the quality of their goods or services. Organizations that perform these checks regularly can automate the text messages so the recipients get them at a specific time or date. Automated feedback or survey texts can look like this:
Example: We’d love your feedback [RECIPIENT’S NAME]
We noticed you’ve ordered [MOST FREQUENT ORDER] the most this month, and we’d love to know what you think. Help us improve by telling us about your experience. It’ll only take a minute! [SURVEY LINK].
6. Drip Campaigns
Drip campaign automated text messages are a series of pre-scheduled, tailored messages sent over time to provide useful information, nurture leads, and encourage engagement. They build customer relationships by delivering relevant content at the right moments, guiding potential customers toward making a purchase. Running automatically once set up, these campaigns save time, ensure consistent communication, and allow businesses to track and adjust for better results, keeping customers engaged and informed without overwhelming them.
Example: New Customer Discount
Hi [Customer Name], welcome to [Your Brand]! We’re excited to have you with us. Enjoy 10% off your first purchase with code WELCOME10. Shop now: [link].
7. Emergency Alerts
An automated emergency alert text message is a quick and efficient way to notify people about urgent situations, such as severe weather, natural disasters, or public safety threats. These messages are sent automatically to provide immediate information and instructions, helping to keep everyone informed and safe. They ensure that important alerts reach people quickly, even if they are not watching the news or using other communication channels.
Example: Emergency Alert
EMERGENCY ALERT: Tornado warning in your area. Seek shelter immediately in a basement or interior room away from windows. Stay safe!
How to Send Automated Texts
Automated text messaging is no longer a luxury. In fact, it has become so applicable in everyday life that you can use it to send simple messages like birthday texts. But there’s more. Companies also use it to reach their employees and clients because these text messages have proven effective for communication once set up correctly.
In this section, we will explain how to set up an automated text message service using Android, iPhone, and a text messaging application like DialMyCalls.
How to Send Automated Text Messages on Android Devices
When you think about sending automated texts on Android phones, the first thing that comes to mind is that you will need a third-party app. However, you can automate your texts from an Android phone using your default messaging tool like Google Messaging or Samsung Messages for Samsung Android devices. Here’s how to do it:
- Open your default messaging app
- Tap on the “Start Chat” icon
- Enter the recipient’s number
- Compose your message in the text field
- Tap on the ‘+’ sign or hold the ‘Send’ button
- Select ‘Schedule Message’ and choose when to send the text
- Complete your scheduling
Step #1: Open Your Default Messaging App
Android phones have a built-in application for sending text messages. Most of these devices use Google Messaging as their default texting app, while Samsung phones use Samsung Messages. Since this application is a platform for sending and receiving text messages, you should see your recent messages once you open it.
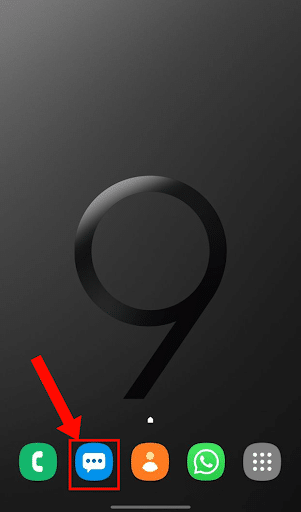
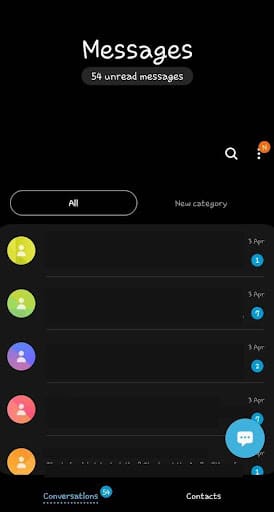
Step #2: Tap on the “Start Chat” Icon
Some Android phones have a Start Chat button, and others have a Chat icon located at the bottom right corner of the screen. This button leads to a page where you can create a new text trail with a new recipient.
![]()
![]()
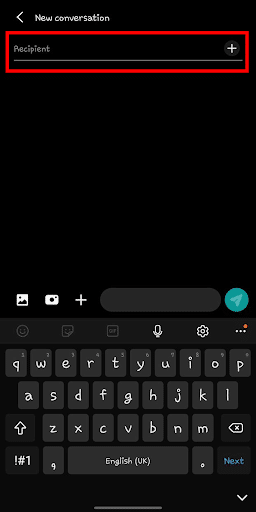
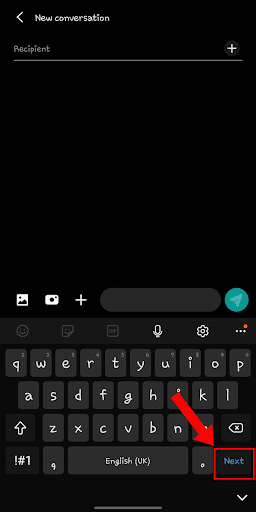
Step #3: Enter the Recipient’s Number
At the top of your phone’s screen, you will find a data entry field for the recipient’s phone number. In this field, you can enter one recipient’s number or multiple numbers to send a mass text. To do this, you can select a recipient from your contacts or type in the number from an external source. Ensure to double-check to confirm the contact details and then click Next.
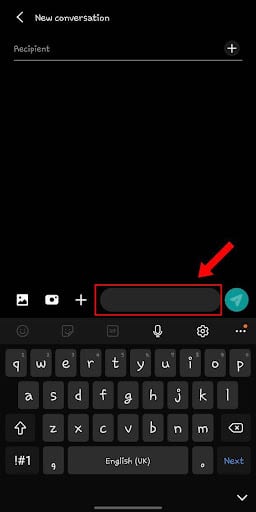
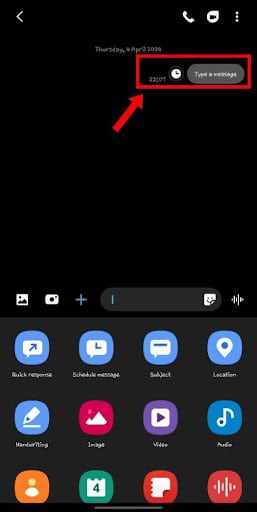
Step #4: Compose Your Message in the Text Field
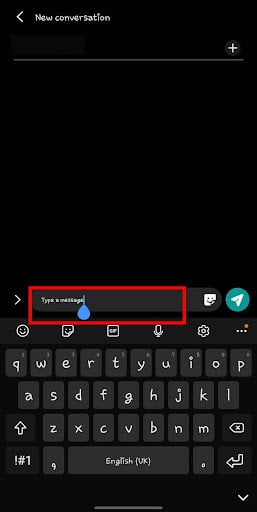
Immediately after clicking Next, your phone should automatically take your cursor to the text field for your message. However, if it doesn’t, you will find the field at the bottom of your screen with a Type a Message call-to-action.
You can compose and customize your message to your taste in this field. Remember that texts should be as concise and informative as possible with minimal to no errors or typos. This ensures you pass accurate information to your recipients.
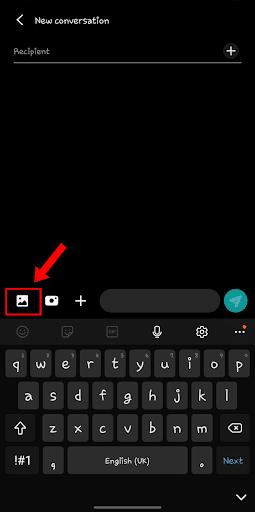
You can also add an image or video to your message by clicking the icons towards the left of the text field. To add a picture or video, click on the Image icon, and to take a new image or video, click on the Camera icon.
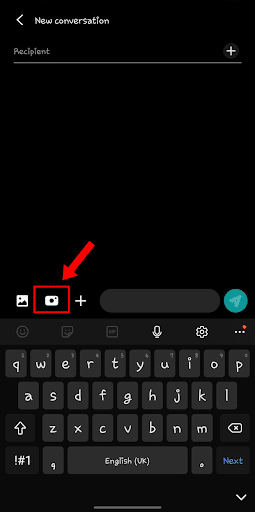
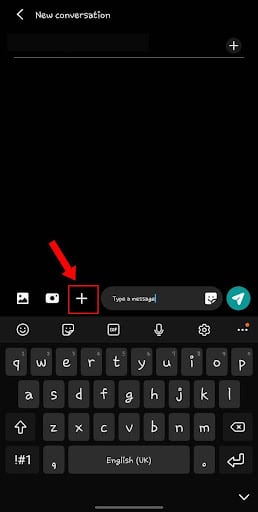
Step #5: Tap on the “+” Sign or Hold the “Send” Button
The ‘+’ button is typically located towards the left of the message field, next to the picture and camera icons. Clicking on this button would open a taskbar showing multiple actions, which you can use to optimize your message further. If you can’t find the ‘+’ button, press and hold the send button to access the taskbar.
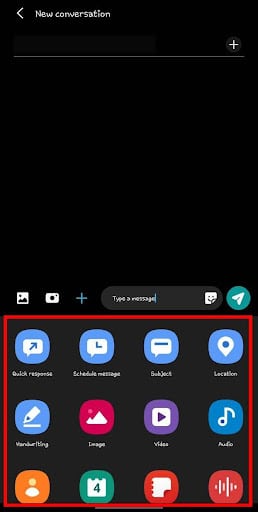
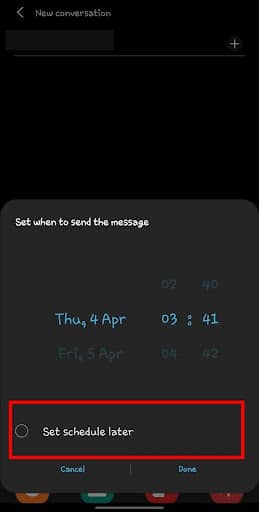
Step #6: Select “Schedule message” and Choose When to Send the Text
You will see the Schedule Message icon in the taskbar you’ve just opened. Clicking on it would lead you to a page where you can select a time and date for the application to send your text.

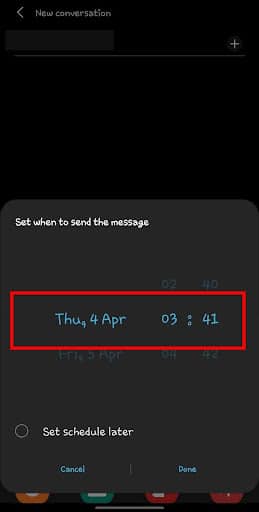
You can also schedule the message later by checking the Set Schedule Later box. This would save your message as a draft you can later revert to and make necessary changes before scheduling it.
Step #7: Complete Your Scheduling
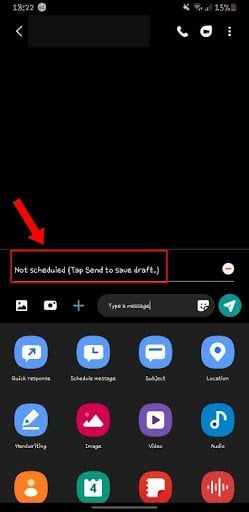
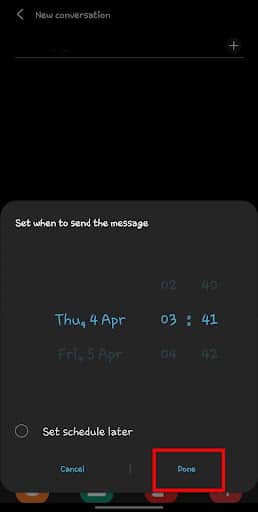
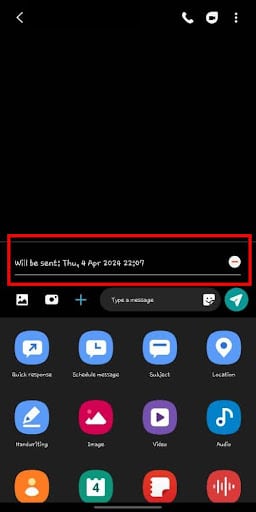
After setting the date and time, you can finish by clicking Done at the bottom right of your screen. This will take you back to the text with a message confirming your scheduling. At this point, cross-check to confirm that everything is set up appropriately before clicking Send to complete the action.
How to Send Automated Texts on an iPhone
Unlike Androids, you can’t directly automate messages from the iPhone default messaging app, iMessage. Instead, iPhones have a pre-installed tool called Shortcuts for message automation. Here’s how to set up automated text messages on an iPhone:
- Open the “Shortcuts” app
- Select the “Automation” button
- Tap “New Automation”
- Choose a trigger
- Configure your trigger
- Select your preferred action
- Write your message and enter the recipient’s details
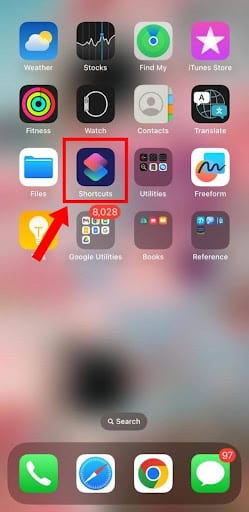
Step #1: Open the “Shortcuts” App
Shortcuts is an application that allows users to combine actions and automate tasks. This feature comes pre-installed in all iOS 12 devices and later, but some functionality might be absent in iOS 12 devices. Essentially, all recent iPhones have the application. However, you can install it from the App Store if yours doesn’t.
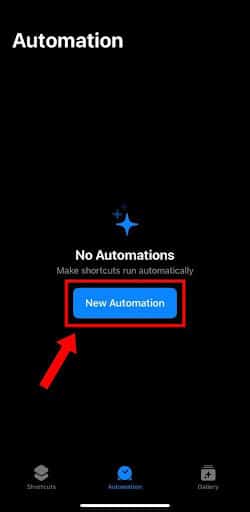
Step #2: Select the “Automation” Button
You’ll see a taskbar at the bottom of the screen displaying three functions: Shortcuts, Automations, and Gallery. Select the Automations button in the middle. This will lead you to a list of your active automations. If you haven’t created an Automation yet, this page will display No Automations with the option to create a new one.


Step #3: Tap “New Automation”
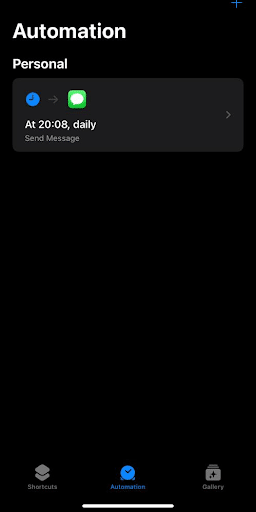
Now, it’s time to create a new automation for your messages. To do this, locate the New Automation button in the middle of the Automation page and click on it. This will take you to a page where you can design a new automation triggered at a specific time, by another message, or by location.

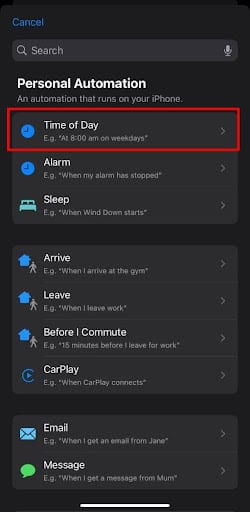
Step #4: Choose a Trigger
On the Personal Automation page, there are various triggers to choose from. Fundamentally, these are actions that would kickstart your automation. You can choose one that meets your requirements. For example, you can select Arrive if you want the automation to run once you enter a specific location. For this example, we’ll choose Time of Day.

Step #5: Configure Your Trigger
After selecting your trigger, the next page gives you various options to configure it. For example, you can set the time to Sunrise or Sunset or select Time of Day to pick a specific time. You can also choose the frequency of your texts. This could either be daily, weekly, or monthly.
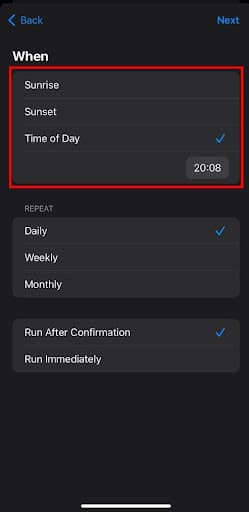

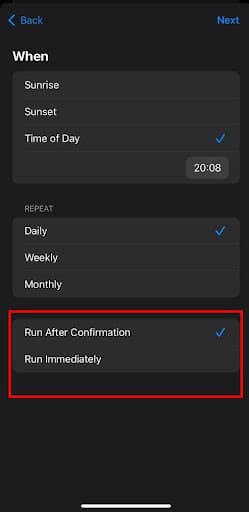
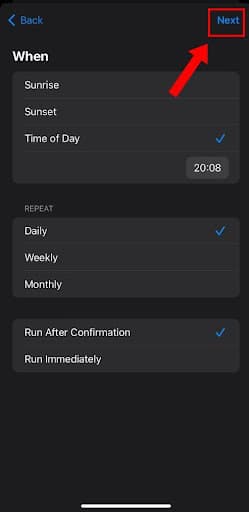
Once you’re done, you can choose whether you want the automation to run after you confirm it or immediately after you hit send. Then, select Next to proceed to the next page.
Step #6: Select Your Preferred Action
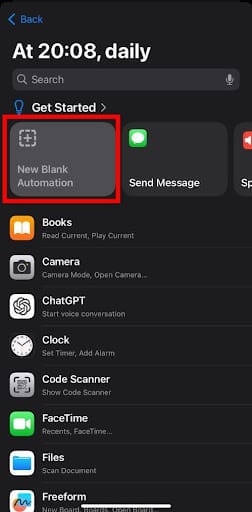
On the next page, you will find various options for the action you want to automate. Since we’re trying to set up a system to auto-send text message notifications, select Send Message.
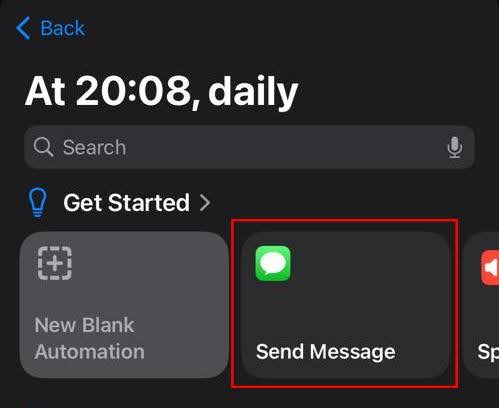
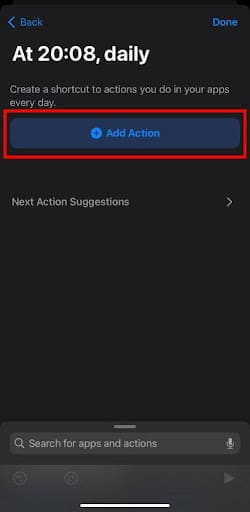
If you don’t see the Send message button, select New Blank Automation and click Add Action. Then, search for add the Send Message action manually.
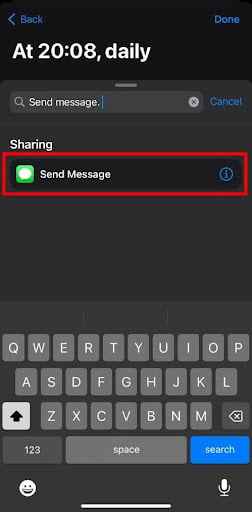
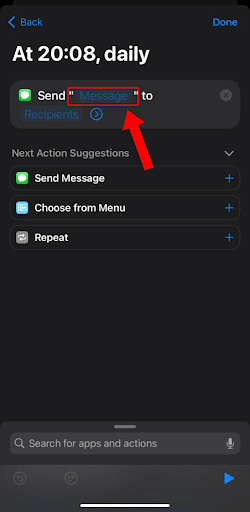
Step #7: Write Your Message and Enter the Recipient’s Details
After adding the action, the application opens a page where you can type in your message and the recipient’s contact details. To type in your message, click on Message.
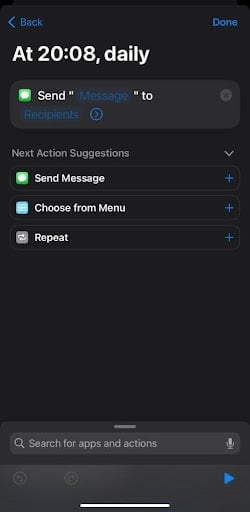
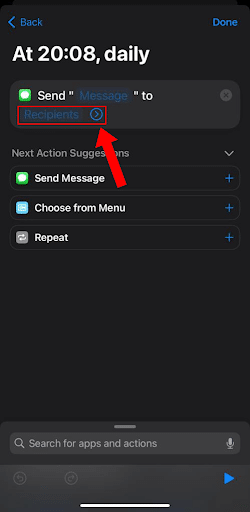
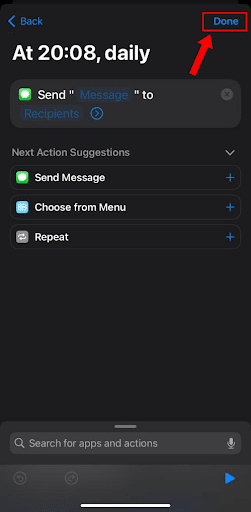
To enter the receiver’s phone number, tap Recipients and add the contacts you would like your message to reach. You can do this by typing their phone numbers or contact names. Remember, you can only text people in your contact list, so you must have all your recipients’ contact details saved on your phone. Finally, click on Done to complete your text automation.
How to Send Automated Text Messages Using DialMyCalls
- Choose a reliable platform
- Add or Import Your Recipient’s Contact Details
- Create a New Broadcast
- Add Recipients to Your Broadcast
- Type in Your Message
- Recurring Messages
- Confirm Broadcast
- Analyze Broadcast Reports
- How to Send Automated Text Messages on Android Devices
- How to Send Automated Texts on an iPhone
Step #1: Choose a Reliable Platform
While phones suffice for sending simple automated text messages, third-party apps can empower you to perform more complex functions like 2-way messaging or bulk texting. Safe to say, the more your texting needs, the more you might need a mass texting service like DialMyCalls.
With DialMyCalls, you can perform a range of text automation functions such as:
- Two-Way Communication
- Mass Automated Text Messaging
- Integrations
- Voice Broadcasting
- Email Broadcasting
To top it off, it makes sending automated text messages a walk in the park. Here’s how to do it:
Create an Account and Sign in to Your Dashboard
To access the features DialMyCalls offers, you need to create an account first. Go to the DialMyCalls website and click Sign Up at the upper left of the taskbar. Conversely, you can go directly to our Sign Up page.
Enter your details in the respective fields on the next page and sign up.

Registering for a DialMyCalls account is free, and you will get 25 credits as a welcome bonus. However, as you continue to use it, you will need to purchase more credits or join any of our plans to access premium features.
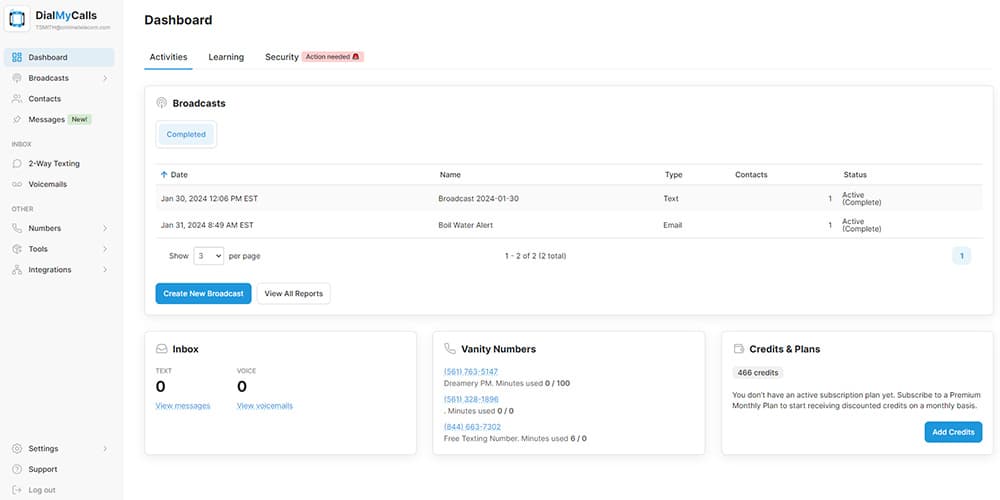
After creating your account, the site logs you into your dashboard, where you can see your inbox, credits, and subscription plans.
Step #2: Add or Import Your Recipient’s Contact Details
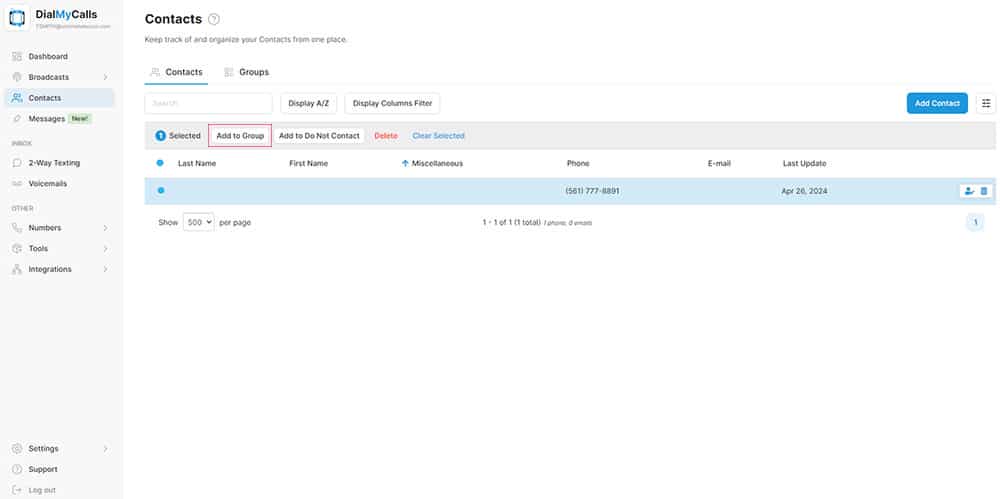
DialMyCalls offers a contact bank containing all your recipients’ contact information, which is handy for sending text messages. You can manually add contacts to this bank or import them from a database. To do this, go to Contacts and select Add Contact.

From here, you can manually add the contacts individually or in batches or import them from an external file.
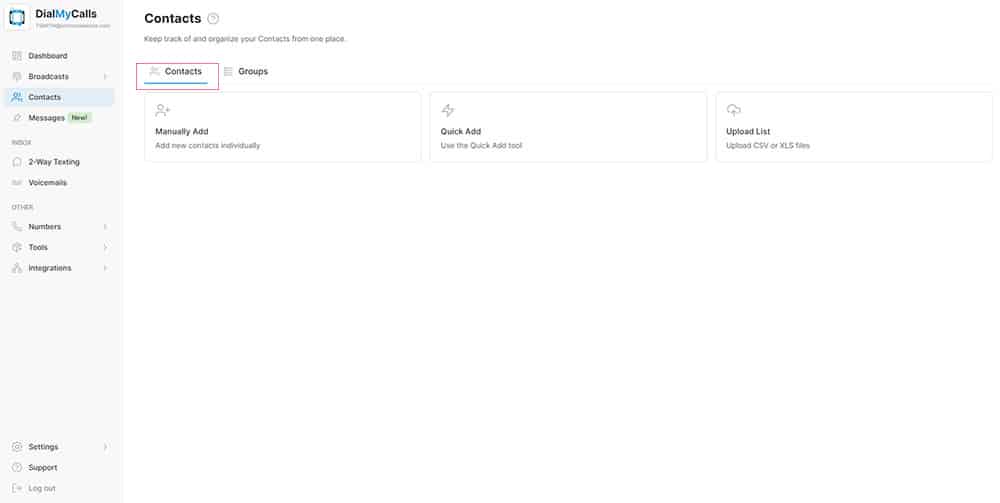
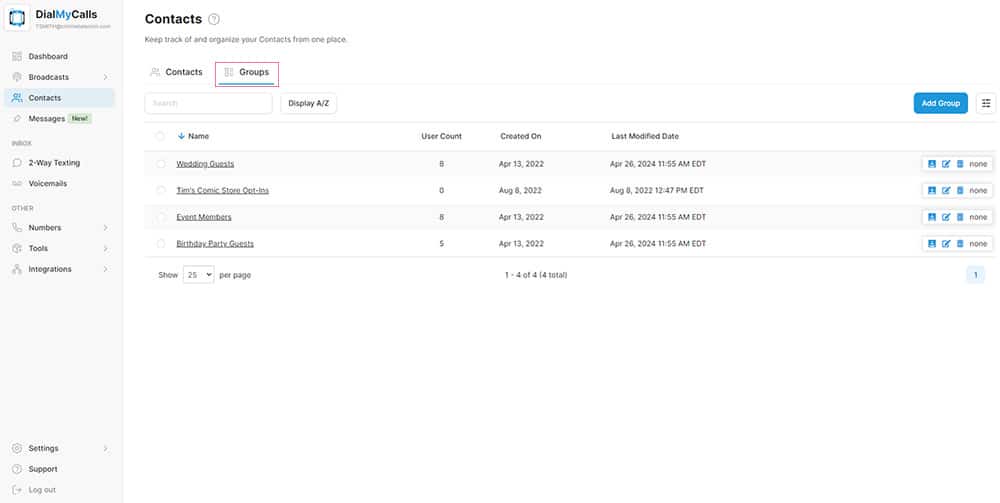
You can also group your contacts by selecting Groups and creating a new group. Then, go to your contact bank and choose the recipients you want grouped before tapping Add to Group.
Step #3: Create a New Broadcast
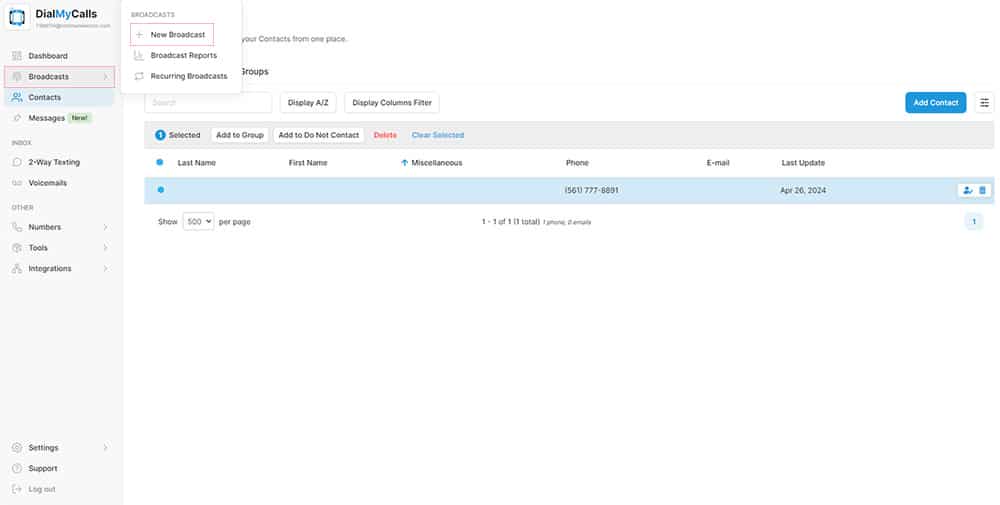
On the sidebar, select Broadcasts and then tap New Broadcast to create a new message broadcast.
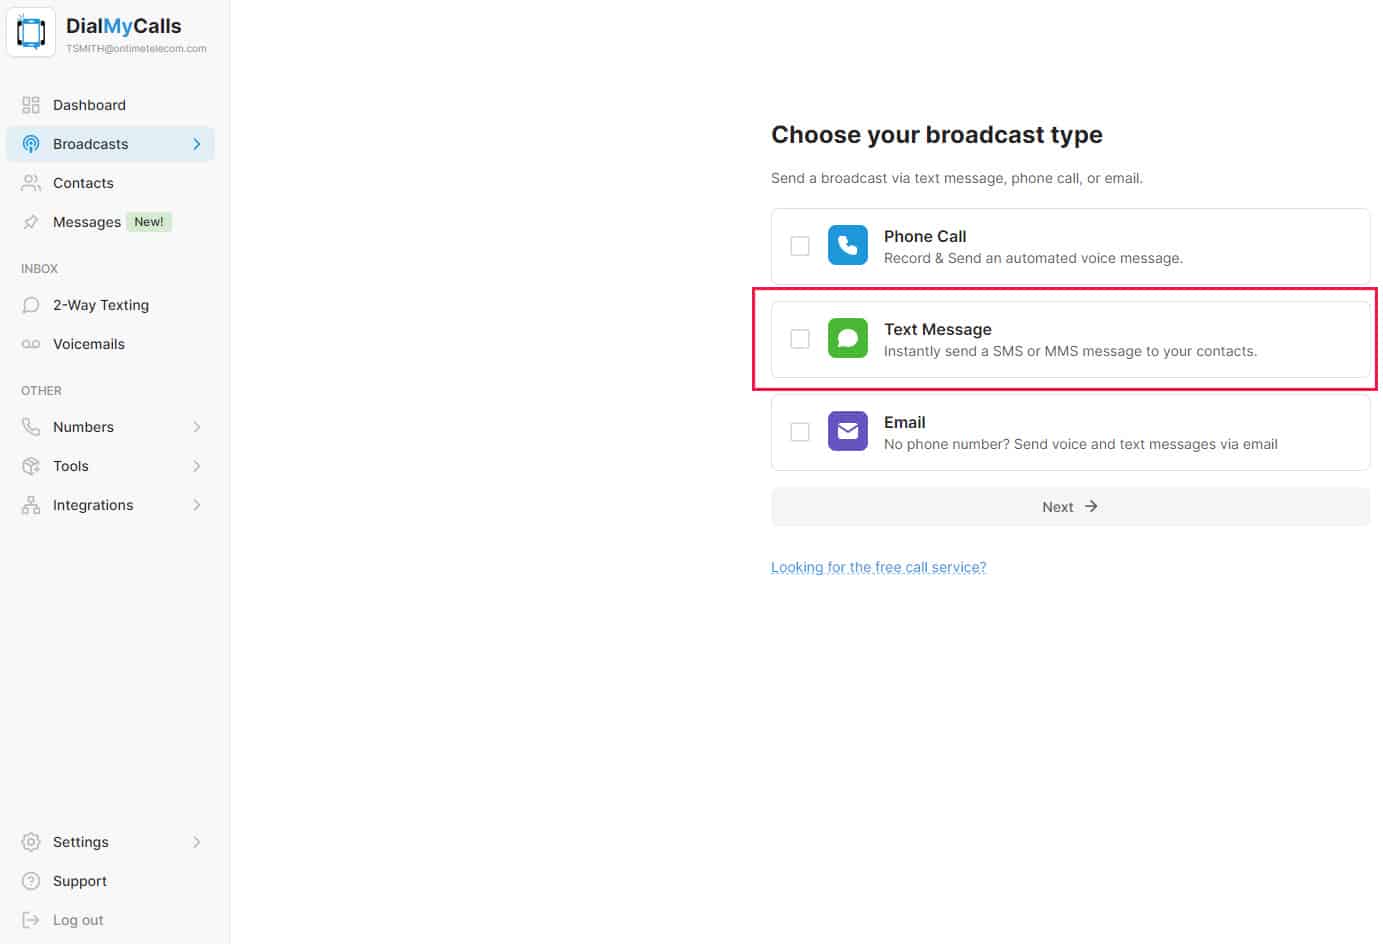
The next page allows you to choose the type of broadcast you want to send out. Since we’re automating a text message, select Text Message and click Next.
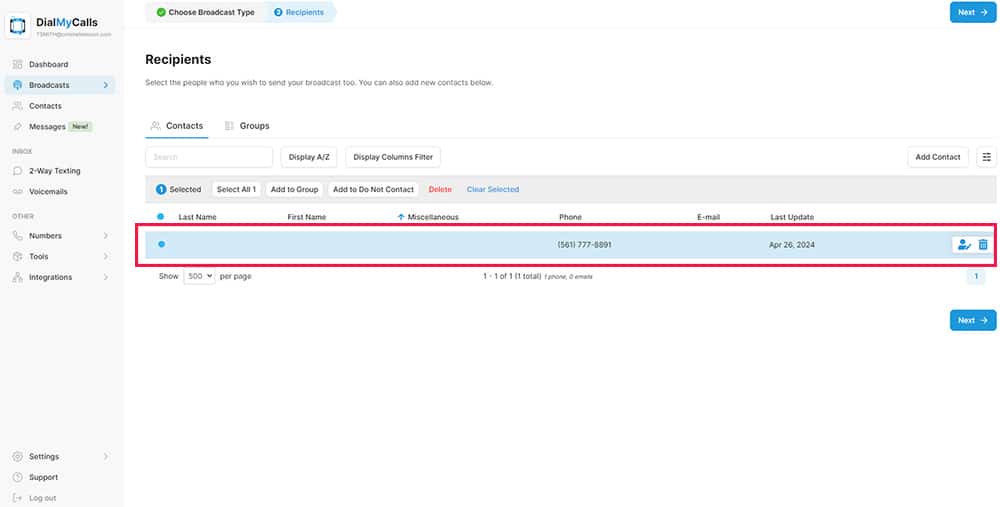
Step #4: Add Recipients to Your Broadcast
Choose the recipients you would like to send a text to. If you’ve already grouped them, go to Groups and select the group you want. When you’re done, tap Next.
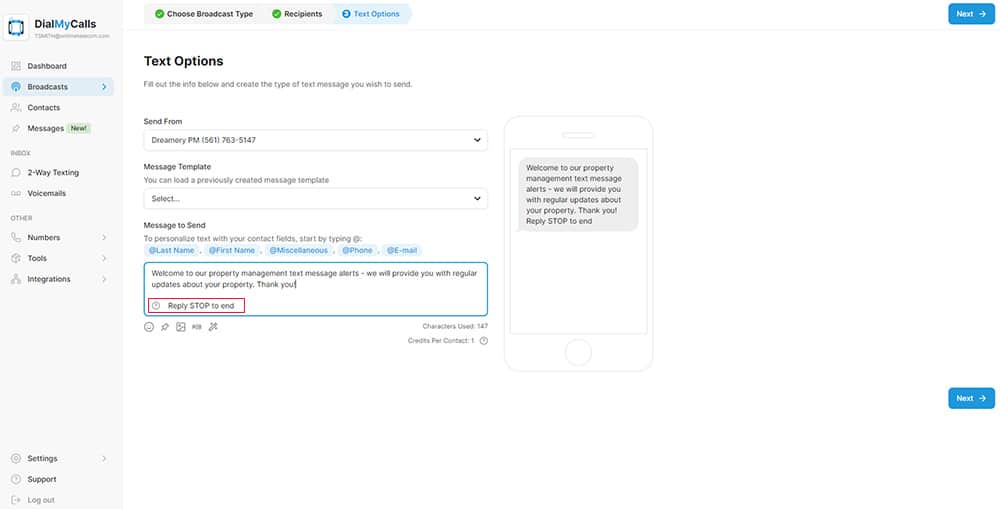
Step #5: Type in Your Message
The following page has different tiles where you can create a message and have a preview of the text. You can write your text to meet your standards in the text field. There are also options to personalize the message by adding the recipient’s name, email, or phone number.
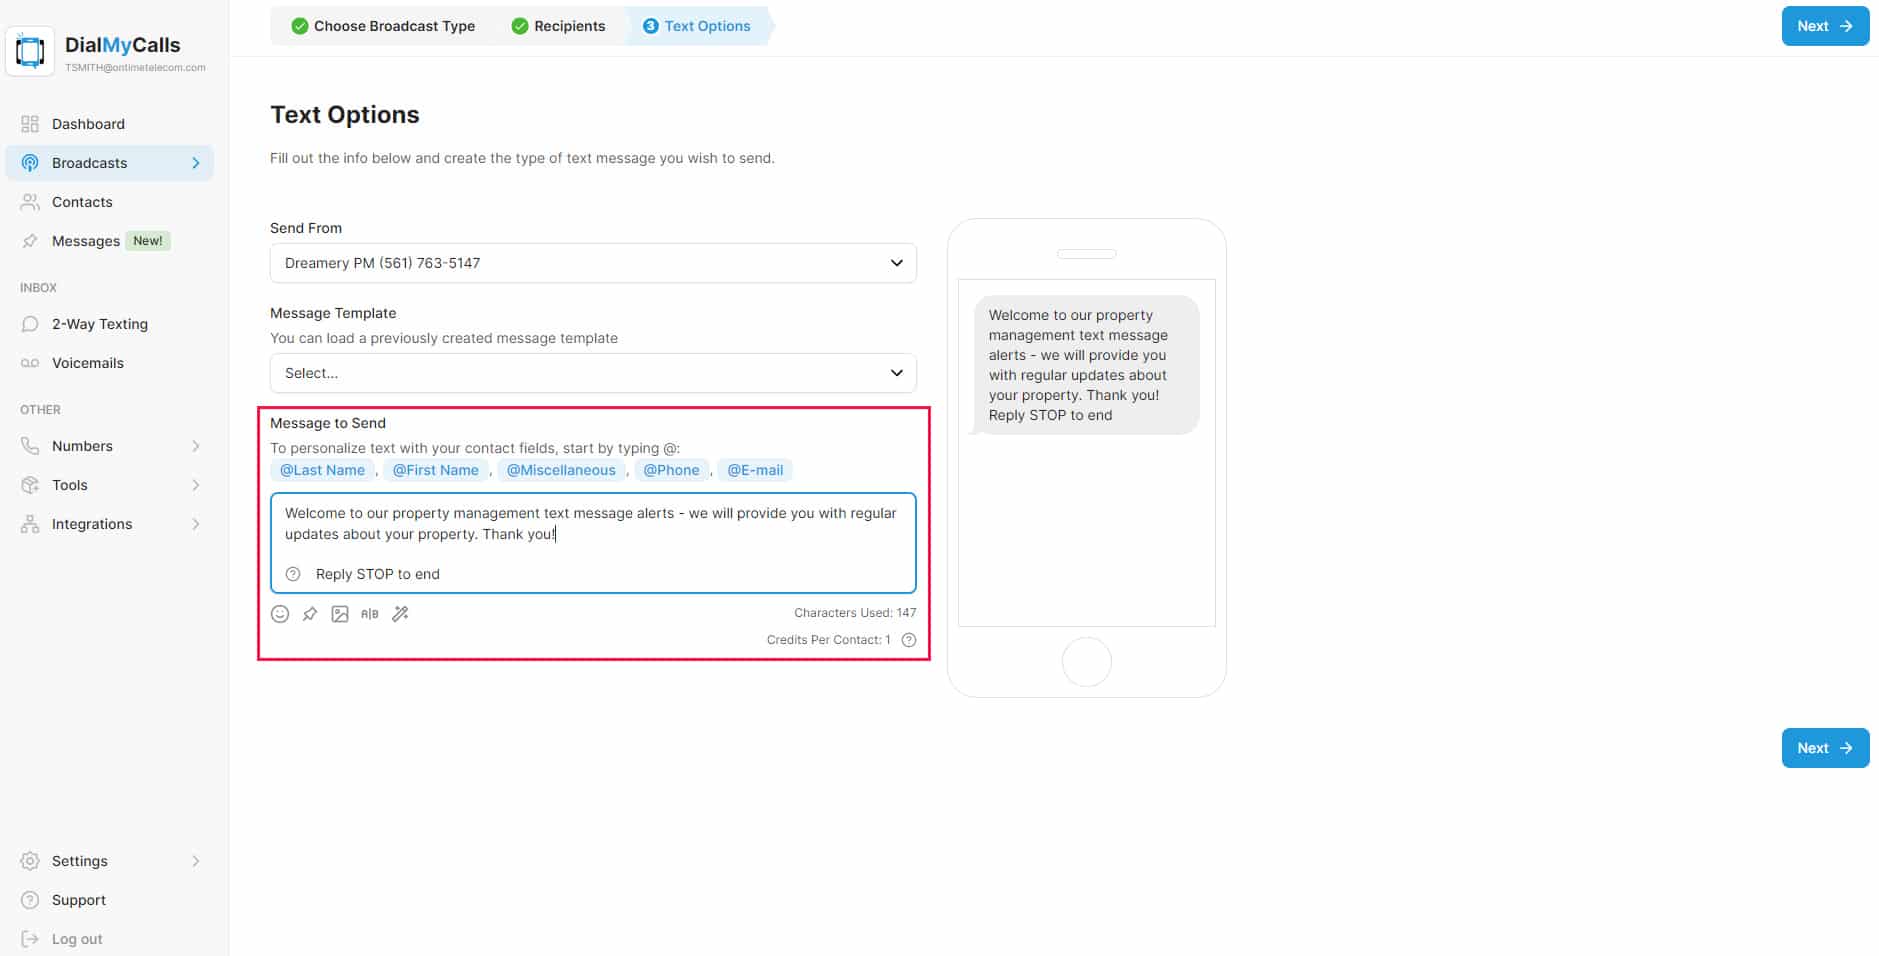
You can edit the opt-out prompt below the text field if necessary.
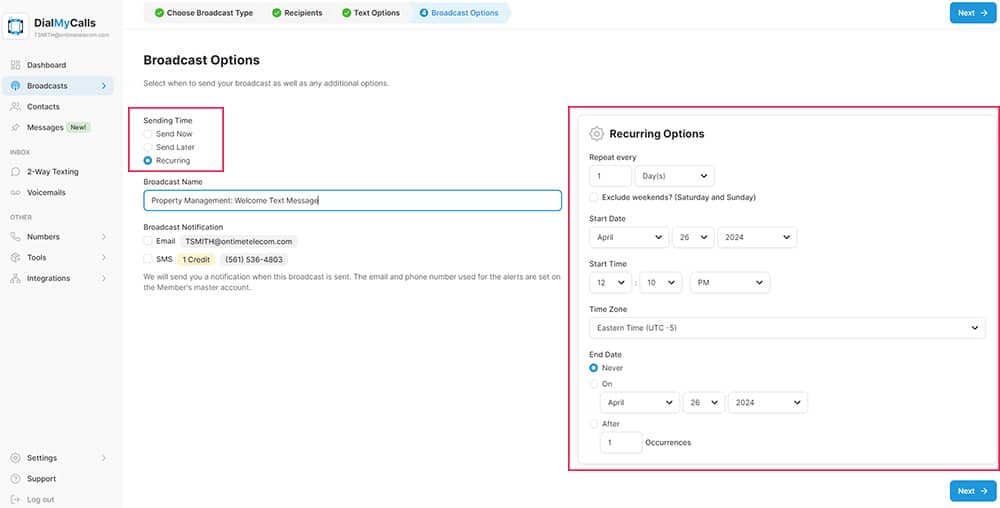
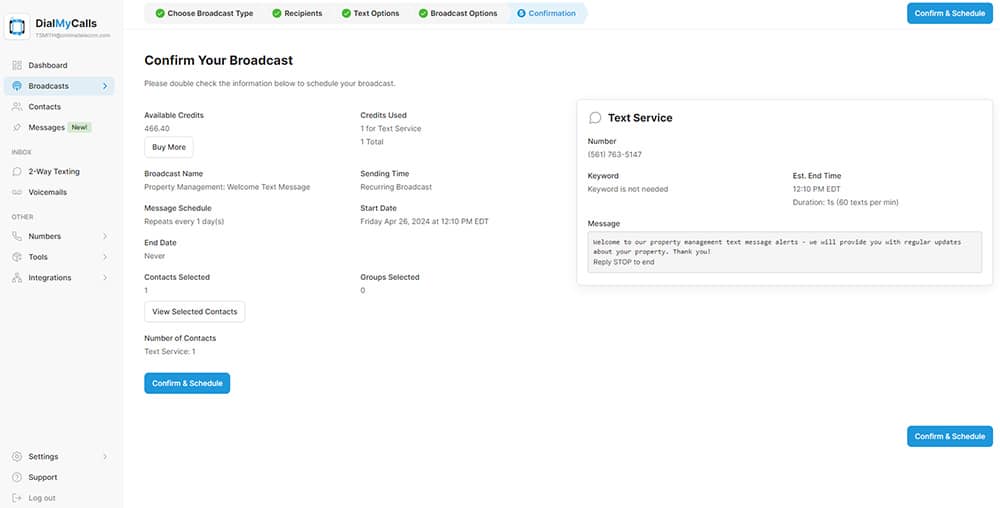
Step #6: Recurring Messages
After typing in the message and confirming that it is accurate and error-free, click Next to access the send page. Here, you will see the number of recipients your message will reach and the time your text will be sent. To set up a recurring message, click the “Recurring” option and you will be able to set up a text message to go out daily, weekly, or monthly from your account. Once you have set up your recurring broadcast, click next.
Step #7: Confirm Broadcast
On the next step of your broadcast, confirm everything is correct before you send it out to your contacts.
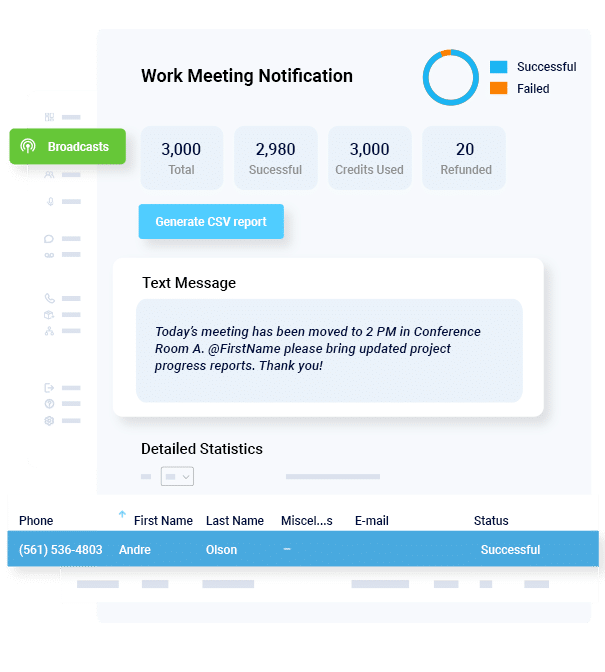
Step #8: Broadcast Reports
Once your broadcast has been sent out, you can view the broadcast reports to see the details of each text message sent.
How to Choose the Right Tool to Auto Send Text Messages
Choosing the right tool to send automated texts is about balancing your needs and the platform’s features. With many options available, it is crucial that you find what matters the most according to your standards and then gauge how well the tool meets those standards. Let’s delve into how to choose the right text automation tool for you:
1. Evaluate the platform’s features
The first thing to look out for when choosing a tool to send automated texts is its features and capabilities. But this can be tricky because numerous features don’t necessarily make a tool right for you.
Evaluating an automated text tool involves comparing your needs to the platform’s features. This lets you see how well the platform caters to your requirements and tells you whether or not it is worth a try. While doing this, you should also assess whether the platform leaves room for scalability, especially if you’re a growing business.
2. Assess the Tool’s Ease of Use
No matter how many features a platform has, you might have a problem automating your texts if it’s challenging to use. Some major indicators of how easy a platform is to use are the presence of navigation instructions and a demo on how to use it. It’s also essential to use tools with simple and user-friendly interfaces.
3. Check for Compliance
The last thing you want when sending automated text messages is to breach compliance regulations. To be safe, it’s always best to check how the platform handles the information you share with them. You should also look for certifications indicating that the text automation tool complies with laws like the Telephone Consumer Protection Act (TCPA).
Sending Automated Texts FAQ
Can you set up an auto reply for just 1 person?
You can set up auto-reply text messages for when people opt in to receive text message broadcasts from your 10DLC texting number that you receive when signing up for an account with DialMyCalls.
Can you send texts automatically when you arrive or leave a place?
While some services do offer geo-fencing, DialMyCalls does not have this feature but may be able to be added using an integration from Zapier.
How much does it cost to send automated texts with DialMyCalls?
DialMyCalls offers several pricing options when it comes to sending automated texts. Choose between a standard monthly plan, premium monthly plan or pay-as-you-go-credits – for more information, check out DialMyCalls pricing now!
Parting Advice for Sending Automated Texts
Automated texts are game-changers in virtual communication. They enable you to schedule messages, auto-reply, and even send location-based texts. As an added benefit, sending automated text messages from your Android or iPhone is a breeze, especially after following the steps in this guide.
However, if you’re ready to level up your text game, check out DialmyCalls. It’s one of the best mass texting services with advanced features like an Access Control System and Email Your Message feature. Register with DialMyCalls today, and let’s show you what easy text automation looks like.
Reach Thousands, Instantly
Grow Your Business by Leveraging Mass Texting


![What Is Conversational AI in SMS & Calling? [+ Real-World Applications]](https://www.dialmycalls.com/wp-content/uploads/2025/06/conversational-ai-in-sms-and-calling.jpg)